 Tax Levy Procurement How-To Slideshows
Budget Overview

CUNYfirst Navigation: Enterprise Menu > Financials Supply Chain > Reporting Tools > Query > Query Viewer. Search for Query Name 'CU_BUDGET_OVR_EXP_DEPT_SR' and click on Search (see Business Objective) Requesters must run the Budget Overview query in CUNYfirst to confirm the general availability of funds prior to creating a requisition. This query provides summarized budgetary data required for acquiring goods or services. It also enables colleges to manage their budgets effectively throughout the year and at year-end.

Click Run to Excel link.

Enter applicable parameters and click on View Results.

Open the query output file with MSFT Excel.
(see Table Legend) Allocate Budget
- -Funds assigned to a department
 Pre-Encumbrances
- -The sum of all fully approved and successfully budget checked requisitions
 Encumbrances
- -The sum of all successfully budget checked Purchase Orders
 Expenditures
- -The sum of all successfully paid expenses (ex. vouchers, expenses reports)
 Available Budget
- -Remaining funds available to a department
Create Requisitions

CUNYfirst Navigation: Enterprise Menu > Financials Supply Chain > eProcurement > Create Requisition. If prompted, enter your Business Unit, Requester (when applicable) and click on Ok. (see Business Objective) CUNY acquires goods and services through a competitive bidding process managed by the Purchasing department. Departments are required to create a requisition stating their business needs. It is strongly recommended that Requesters run the Budget Overview query in CUNYfirst to confirm the general availability of funds prior to creating a requisition. If sufficient funds do not exist, requisitions will fail budget checking process and will not route to the Purchasing department. Requesters must contact their Budget Office to correct budget issues.

There are three stages in the creation of a requisition.

It is good practice to name your requisition, see above example and click on Continue.

Always click on Special Request tab, then Special Item.

Enter all required information including Item Description, Price, Quantity, Category Code and Unit of Measure. Vendor ID is not required. Above are the most commonly used category codes. Use the CUNY General Ledger Chart of Accounts to determine appropriate cateogory codes when creating requisitions.

Click on Add Item.
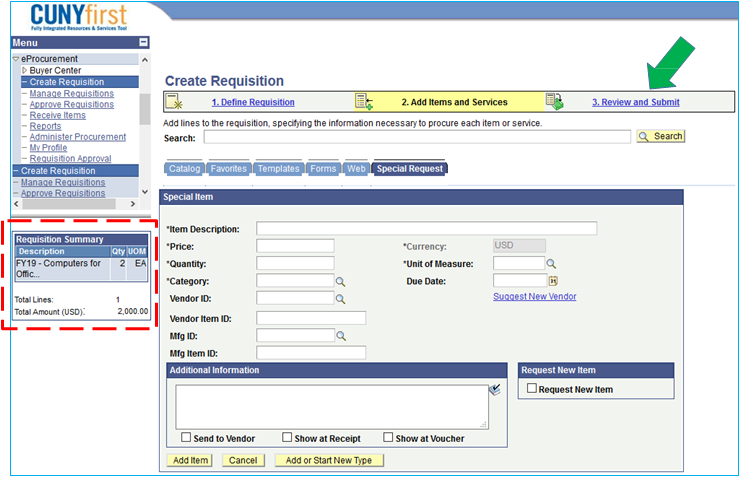
The item will display in the Requisition Summary box to your left. The system is ready to enter any additional requisition lines details as needed. For this example, we will review the single item and submit the requisition for approval and budget check. Click on Review and Submit.

Click on the triangle  to the left of the Line Description to see more details.

All requesters have a set of default chartfields (CUNYfirst codes that identify the transactions in the system) when they were initially setup in CUNYfirst. Example of chartfields are GL Unit, Account, Dept#, Major Purpose Code, Budget Date and others. Default chartfields can be reviewed and changed for each line in the requisition. You can see all of them by clicking ‘Chartfield1’, ‘Chartfield2’, ‘Chartfield3’ and ‘Details’ tabs.

y clicking on Chartfields2 and Chartfields3, you can review/change the chartfields associated with this requisition. Each requestor has a set of default chartfields that will automatically populate a requisition. These chartfields can be changed during the creation of the requisition.
Requesters are required to add supporting information as an attachment. At minimum the following document are required:
- Needs justification (What and why are you requesting this goods/services)
- Any vendor budgetary quote (detail of good/services to be acquired and cost)
- Any additional supporting documentation
Purchasing agents will use the attached support to document their due diligence and compliance process. Click on the Callout icon ![]() to add supporting documentation.
to add supporting documentation.

Click Add Attachment icon to add attachment(s), browse to select the file(s). Use short and concise file naming convention. For example: Needs Justification; Budgetary Quote; etc. Important Note: Check all three boxes: "Send to Vendor/Show at Receipt/Show at Voucher." Click Upload and finally OK.

Once the requisition is ready to be saved, click on Save & preview approvals. This will save the requisition by assigning a requisition ID and will illustrate the approval routing the requisition will follow.

Workflow routing will display. Click Submit to initialize the approval process.
Amount Only


Manage Requisitions

CUNYfirst Navigation: Enterprise Menu > Financials Supply Chain > eProcurement > Manage Requisitions
Enter as much information to locate the requisition to be reviewed. For example, Business Unit, ‘date from’ and ‘date to’ has been entered. Click Search. (see Business Objective)Manage Requisitions page will enable you to view requisitions and track their progress from creation to payment. Most importantly this tool will advise budget status since a requisition with budget error status DOES NOT route to the Purchasing Department.
Edit Requisitions

CUNYfirst Navigation: Enterprise Menu > Financials Supply Chain > eProcurement>Manage Requisitions and search for the requisition that is in Approved Status and Budget Error (see Business Objective)If funds are not available in the chartfield string, requisitions will fail the budget check process (see Budget Overview Query section). Requesters must contact the Budget Office to correct the error. Requisitions in budget error DO NOT route to the Purchasing Department.

Select Action dropdown to the right of ‘Total’, select ‘Edit Requisition’ and click on GO to investigate the details of the error

Read the message carefully. Click Ok

System indicates that current requisition has failed budget check, click OK. Click on the Error hyperlink

There are a few reasons why a requisition will fail the budget check process; this one reads: ‘No Budget Exists'

Click on the ‘Budget Chartfields’ tab to esure that all chartfields include Budgetary Account.
NOTE: Requisitions with budget errors will not route to the Purchasing department.
Cancel Requisitions

CUNYfirst Navigation: Enterprise Menu > Financials Supply Chain > eProcurement > Manage Requisitions and search for the requisition. Click on the 'Select Action' dropdown  and select ‘Cancel Requisition’ then click the GO button. (see Business Objective)If goods or services are no longer required and a PO has not been created against the request, at times, a requisition will need to be canceled. When a requisition is canceled, the pre-encumbrance is released once the canceled requisition is budget checked.

Click on the Cancel Requisition button.

Once the requisition is canceled, the status of the requisition changes to ‘Canceled’.

Requesters need to do a budget check to ensure pre-encumbrance funds return back to their budget. Click on the Select Action dropdown and select ‘Check Budget’ then click on the GO button.

Once the requisition has been budget checked, the budget status of the requisition changes to ‘Valid’. This completes the cancel process and ensures funds are returned to the budget for the department.
Approve Requisitions

CUNYfirst Navigation: Enterprise Menu > Financials Supply Chain > eProcurement>Approve Requisitions
Enter as much information to locate the requisition to be approved. For example, enter ‘date from’ and ‘date to’ and keep default Status; Pending. Click Search (see Business Objective)All requisition approvers (supervisors, department approvers, category approvers) will receive an email notification with a link to approve pending requisitions. However, approvers are encouraged to use the Approve Requisitions search page to search for pending requisitions. This page also offers the ability to search for requisitions that have been approved, denied, pending or pushed back. Approvers need to carefully review supporting information including requisition chartfields plus supporting documentation prior to approval.

Summary requisition results are displayed. Click on Req ID to review requisition details prior to approval.

To review the requisition line detail, place a check mark on the requisition line to be reviewed and click on View Line Details icon. Requisition Details appear

Once all requisition details have been reviewed and supporting documents verified, the requisition is ready to be approved. Return to the Requisition Approval Page and Click on Approve

Image above illustrates a fully approved requisition:
Create Receipts

Requesters will need to create a receipt in CUNYfirst for all goods and services received

CUNYfirst Navigation: Enterprise Menu > Financials Supply Chain > Purchasing > Receipts > Add/Update Receipts. Select your Business Unit and click on Add

Enter as much information to select the Purchase Order to be received. If you do not know the PO number, you may search by Vendor Name. Click on Search.

Purchase Order displays all applicable lines. Check the box to the left of PO Unit to select the line and click OK.

There are two types of receipts: Quantity-based and Amount Only. Quantity based requisitions result in CUNYfirst receipts that allow Requesters to enter the quantity received (Receipt Qty), based on packing slips and actual count; (adjustments to total price are not allowed). Amount Only requisitions result in CUNYfirst receipts that allow Requesters to adjust the total price (Price) to reflect current invoice amounts; (adjustments to quantity are not allowed. The quantity of Amount Only receipts will always be "1").

Click on Optional Input tab. Enter the Invoice Number as it appears on the actual invoice if available.

Click on Add Comments link. Add a comment, attach documents to the receipt that demonstrate that the goods have been received and click OK.

Click on Save. In this case an inspection is also required because computers have been purchased. An inspection receipt will also be required before the vendor can be paid. Click Ok. The receipt will be assigned a number and the Status will be “Received”.
Please make note of your CUNYfirst Receipt ID.
Cancel Receipts

CUNYfirst Navigation: Enterprise Menu > Financials Supply Chain > Purchasing > Receipts > Add/Update Receipts > Find an Existing Value. Enter business unit and receipt number or PO number. (see Business Objective)At times, receipts need to be canceled due to entering incorrect information or making a mistake.

Click on the red ‘X’ next to ‘Receipt Status’

A message will pop up to confirm the cancelation. Click on Yes and click on the Save button  to save the receipt. A receipt cannot be canceled if a voucher has been entered against the receipt. If the voucher has not been paid, the voucher would need to be deleted before canceling the receipt. Work with your Accounts Payable Office.
Create Inspections

CUNYfirst Navigation: Enterprise Menu > Financials Supply Chain > Purchasing > Receipts > Inspect Receipts (see Business Objective)Receipts are required for all goods and services. Some goods and services may require an additional inspection (Information Technology, Facilities/Furniture, Hazardous Materials, and others as designated by the University).

Enter as much information to select the Receipt to be inspected. Make sure the Correct PO Unit and Receipt Unit are displayed. If you do not know the Receipt Number, you may search by Purchase Order Number as well. Click on Search

Purchase Order displays all applicable lines. Check the box to the left of PO Unit to select the line and click OK

Purchase Order is for a quantity of 2 computers. Enter “2” in the Insp Qty. If the quantity inspected is less than the number on the purchase order, enter the correct number inspected in the Insp Qty box and click on Save.